
The goal of this workshop is to get you better prepared to handle the common mistakes and issues most homeowners face when starting seeds indoors. Remember, just because you start indoors doesn't mean your plants will stay indoors. Here's when to start seeds indoors Michigan.
Why Should I start Seeds Indoors?
Starting seeds indoors in Michigan is beneficial since our short growing season is shorter and we have unpredictable spring weather. Our cool season is marked by chilly autumn months and cold winters. Indoor planting means you don't have to wait to start seeds. By beginning the growth process indoors, you can extend the growing period, giving plants a head start before they face outdoor conditions. This is especially important for frost-sensitive plants and those with long maturation periods, ensuring they reach full development and produce a bountiful harvest in the right soil temperature.
Additionally, indoor seed starting allows for better control over temperature, light, and moisture, resulting in stronger and healthier seedlings ready for transplanting after the last frost date. You can also use a grow light for better control.
We'll discuss all of this in greater detail ahead.
Make a plan:
Before you sow your first seed you should have a thoughtful plan for your garden
This should include:
- Garden map
- List of crops and varieties
- Quantities needed of each plant
- Sow and transplant dates for each crop
Remember, you may also need to call 811 before planning your garden map to determine where vital utility lines are located in your yard. This is especially important if you're planning a greater planting depth after your plants are transplanted outdoors.
Pick your seeds:
It's always smart to buy new seeds at the beginning of each year. Pick a starting mix you and your family will actually eat. Review the package instructions carefully to ensure they'll fit your family's lifestyle.
Why not use old seeds?
- Old seeds can have reduced germination if not stored properly.
- Old seeds can take longer to germinate, screwing up your timeline.
- New seeds are generally cheap and the predictability of them makes it worth the extra cost.
Purchase from a reputable source.
- Local garden center
- Baker Seeds
- Johnny's Seeds
Create your space for seeds to germinate:
Be thoughtful when picking the location to germinate.
- Seeds will need a consistent environment with minimal fluctuations in light, temp, humidity.
- Depending on how many trays you plan to use, a sunny south-facing window can suffice.
- For some garden vegetables, the best location is near a sunny window. However, check the package instructions on your seed packet to confirm the right amount of sunlight or grow lights.
Lighting:
- Uniform, high light is very important to get seeds to sprout and to get a nice, sturdy starter plant.
- Grow lights are your best option when starting seeds indoors.
- Make sure to use bulbs specific to plants for the best results.
- Lights should be kept 4″ – 12″ away from plants.
- Lights should be kept on a timer for 12 – 16 hrs per day.
- T-5 Fluorescent lights
- Lower initial cost
- Higher energy use but still minimal
- Bulbs need to be changed each year
- LED lights
- Higher initial cost
- Lower energy use
- Bulbs last many years
- If artificial lights aren't an option, you will need a south-facing window.
- Window sills can get very cold at night so pull away from the window at night.
- Once seeds germinate it will be very important to rotate your trays so plants don't stretch one direction.
- Low light will lead to weak, leggy plants that are unlikely to transplant into your garden successfully.
Temperature:
- Temperature is one of the most critical elements to getting seeds to germinate.
- Ideally, soil temp will remain between 75 – 80 degrees during germination.
- Lower temps will slow the germination process, keep seeds from sprouting and lead to root diseases such as damping off.
- Higher temps can cause seed death or leggy growth once sprouted.
- Once seeds have germinated day/night temps can be maintained at 65 – 75 degrees.
- The goal with temp is to start very nice and fluffy and gradually acclimate your babies to cooler and cooler temps as they develop and they are close to transplant date outside.
- Using a seedling heat mat is a great way to ensure the soil temp is maintained properly.
Humidity:
- Managing the humidity around your seeds can significantly help with germination.
- Getting a dome for your seed tray is an easy way to maintain high humidity around your seeds.
- Domes should be removed after seeds have sprouted and have 2-4 leaves.
- Be careful when removing the dome and give seedlings a chance to acclimate. Start by cracking it open on one side for a day before fully removing it.
Seedling soil:
Container or tray:
- Use a tray that contains many small individual cells.
- Ensure your cell tray has drainage holes before planting seeds.
- Find a cell tray that will fit inside another tray with no drainage so you can catch runoff and bottom water.
- If trays have been used once, sterilize prior to seeding with a solution of bleach. Make sure to rinse very thoroughly before planting seeds.
Sowing Seed:
- Sow fresh seed according to package directions.
- When directions are not available, a rule of thumb is to plant seed four times as deep as its width.
- Use plant tags to identify each tray or cell.
- Record seeding date and plant name
- Use permanent marker
- Ensure soilless mix is pre-moistened prior to seeding.
- After seeds are planted mist or water over again to ensure the seed settles in.
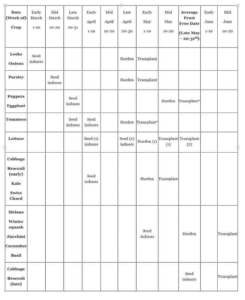
- Here is a great chart to know when to seed each crop:
- Soilless mix should be kept evenly moist during initial germination period.
- Be careful when watering not to wash soil and seed around.
- Misting the soil surface daily with fresh water from a spray bottle is a great option.
- Bottom watering is a nice way to keep the soil damp without washing things around.
- Fill bottom tray with water and let soil wick up water. Dump excess after 10 mins.
- Once seedlings have sprouted start gradually cycling them from wet to slightly dry.
- Seedlings don’t tolerate wilting so be careful not to let them get too dry.
- Keeping seedlings wet all the time after sprouting can lead to leggy growth and root rot.
- Seedlings have energy stored inside them and won’t benefit from fertilizer until there are 4 leaves present.
- Fertilize seedlings with a general all purpose fertilizer at ¼ of the recommended rate.
- Fertilize every 2 – 3 waterings
- Fertilizer rate can be increased to ½ strength once plants have roots to the bottom of the cell.
- When seedlings have outgrown their cell tray transplant into larger container.
- Signs seedlings are ready for transplant:
- Seedlings need water 4+ times per week.
- Root ball is well formed and stays together when pulled from cell tray.
- Plants are crowded and need more room.
- Be careful not to damage the growing tip as this can lead to death.
- Never transplant a dry plant, water day before.
- Seedlings that are started indoors need to be hardened off prior to planting into the garden.
- This process slowly acclimates the plants to outside conditions in a way that doesn’t shock and stunt/kill them.
- Two weeks prior to planting, begin moving seedlings outside.
- Start by finding a semi-sheltered place, not in full sun for your plants.
- Start slow, only putting seedlings outside for a few hours.
- Gradually expose them to more time outside.
- Gradually increase light levels
- By end of two weeks plants should be much tougher and ready for life in your garden.
- Plant your hardened off seedlings when potential for frost has passed.
- Plant either on a cloudy day or in the evening.
- Plants may show transplant shock the first few days by looking wilty, don’t worry.
- Fertilize at transplant time with organic granular fertilizer.
- Water in at transplant time and allow to dry between waterings.
Watering:
Fertilizing:
Transplanting:
Hardening off:
Planting your seedlings in your garden:
It's worth noting the last frost date when starting seeds indoors in Michigan. This can sometimes occur as late as mid-May. Subterranean temperatures, even at shallow depths, will play a role when plants are transplanted outdoors. Remember, some plants are more resistant to frost than others.
Seed Starting Help When you Need it
You might feel a little overwhelmed the the exhaustive measures of seed starting. Don't worry, we're here to help!
We offer everything you need to get your seed starting project underway, including:
- Seed starting mix
- vegetable seeds
- potting soil
- Starting plants
Contact us today to get started!